During this month i found myself working on a load of things, mainly on nCloth again, i had figguered it out but it still wasnt up to scratch. i was also set the task of creating curtain for the interiour shots in Hero 1.0. During this task i also started to experiment with maya dynamics, adding air and turbulance to the scene ment that the curtains would move around like if they were real.
here is a picture of the curtains
as you see with the picture above i have also textured the curtains, i got this texture from the director, it was his choice, we both said that it wasnt very good. we're currently looking for something better.
this month was a rather difficult one as i had a lot to learn. i have agreed for Hero 1.0 to learn maya ncloth to add a duvet to a bed in the film. the bed will need the ncloth fixed to it as in the film a small boy will be jumping out of it. Here is what i had to go through to get it done.
In the image above you can see the stage after I have created nCloth in Maya, at this stage all that is happening is the default gravity in Maya is pulling the cloth down. I found that it will not interact with its surroundings, in the case the bed, if you don't tell it to. To allow objects in the scene to interact with the cloth I needed to add to the object the tool called Create passive collider. This will allow the cloth to land and take form around the object.
at this point in the task I found myself trying to make the cloth stay on the bed, as you can see in the image below the cloth is sliding off to one side, I tried a number of things like trying to key frame is position to stop it falling off, this didn't work and I found myself searching through the internet. After a long while I found that when you add the Create passive collider to an object it creates preferences allowing you to increase certain options on the object. These options are Bounce, friction and stickiness.
What I found when upping the Bounce up to a higher number then 0.050 you will get a slight bounce of the mattress when the cloth hit it, which in real life does not happen. I turned this option all the way down. When it came to friction I found that I had found the answer to my earlier problem, when I turned this up and played my animation through the cloth stayed on the bed and did not slide off. I was very pleased with the results. stickiness is the opposite to the bounce option, it means that if the cloth hit it once then it would stay in that position and not move, it would also have very little influence when it becomes effected by Maya fields such as wind or gravity.
It seemed like the more and more I looked into nCloth and its options the more and more problems my cloth got. After close inspection I realised that I was getting mesh deforming into itself, the image below shows what I mean with this problem. I found out that this is called clipping and its very common when using nCloth, there are options to pain on thickness where is happens but I know that it's not too noticeable when the cloth is thinner, as you can see its way thick in my project. I will later try and thick this by scaling the mesh down.
I came across a rather simple problem when it came to nCloth; this was that I couldn't change the colour of my Lambert! It's usually in the attribute editor but it just wasn't there, I was stuck with red if Kofi asked for a different colour. As you can see there is no Lambert attribute menu.
I researched how to do it and I kept finding AE display under the nCloth submenu, however, these were all on earlier versions of Maya and in Maya 2011 it wasn't there. After a few hours of trying I found myself in the help menu of Maya and asking for AE Display, this is what came up
Another problem solved. I could now change the colour of my mesh! (I late found out that I could have also used the hypershade......)
While doing my research I came across a very interesting tool which allowed me to play with the mesh while it was being animated. For example I could interact with it mess with my passive colliders such as the mattress. In the pictures bellow I tired to show what I meant. The tool is called interactive playback, and I used it to quickly move the mattress up then down to get result shown bellow. I know it won't seem clear but the mesh actually turned almost 360c.
This next image is of another interactive playback test, I tried a smoother approach and let the cloth deform slowly, it wasn't a perfect deformation but I could see how the gravity was affecting the cloth. It was quite fun!
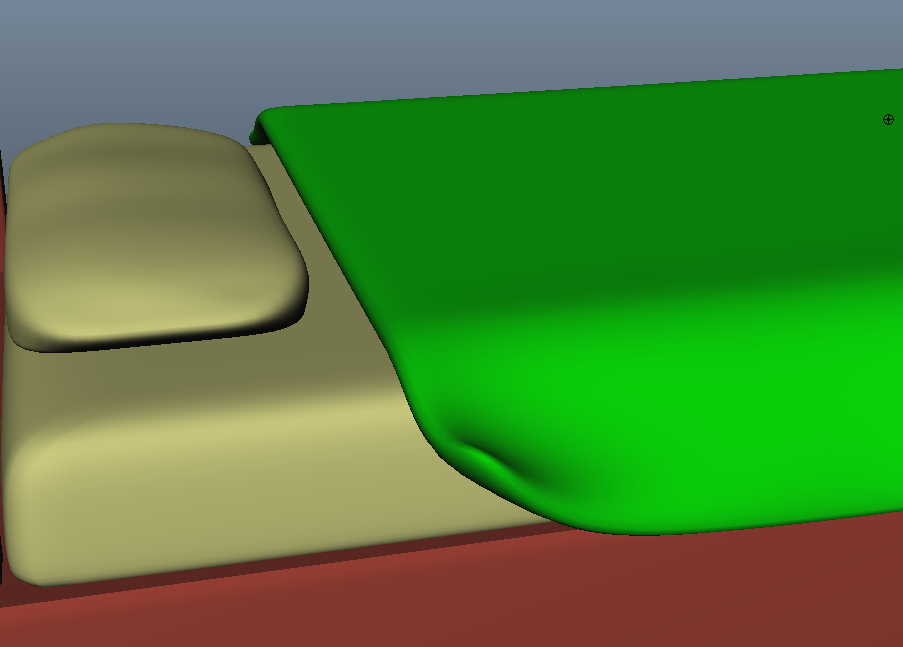
My next problem with nCloth was this strange space that was leaving between the mesh and the passive collider,
I must admit I almost gave up on this one, what I found that kind of work but reset itself each time was moving the passive collider to the right place once the mesh had settled, this was obviously pointless and could not be used in a final film. The gap was really annoying.
what I found was that in the attribute editor you have an option of seeing the collision thinness, this is available for both nCloth mesh and Passive colliders, if you look under collisions> solver display you can see that right now it's turned off so I cant much at the moment.
As I turned it on for both mesh and passive collider this is what happened
As you can see I got an orange mesh appear, this is showing me where the objects will come to rest, in other words, the spaces that have been a bother.
I lowered the thinness for the and I got the result I wanted, it was quite hard knowing where I needed to stop becasue I couldn't see the original objects, I had to switch to wireframe to get a better idea. This is how it turned out.
Problem solved!!
There are other aspects of nCloth which i still need to tackle, i need to be able to pick it up from a corner and have it move naturally incase thats what kofi wants, this is as far as I have gotten with character interaction
It's not much but I believe with a little bit more parctise it can be done.
The video above shows u how the bed will react to the cloth when gravity is added.
this next video shows you how the cloth will react with items when it collides with them. the detai isnt great and the edges are way too sharp but as you can see its working just how i wanted it to.
this last video is a quick example of how the cloth will react to the animation when the kid gets out of bed. there is still a little work to do but it can see it working with a little more time.
personal learning
During this month i also started working on hard surface modelling, i have done some for the films before but i found myself using the same techniques, i decided to step up my game and do things which i hadn't done before,
for my first model i decided to go for a dirt buggy, i like the idea of it as it was an opened top car and i wanted to try and model the engine and interior.
here is a picture of what i managed to do with my skills.
This first image shows my way of tackling the problem of the frame, i found it quite useful when looking back at the previous month when i had to model the park bench, using the nurbs circles and lofting them worked on here too.
This image is what i had accomplished with simple modelling, as you can see when put together it really brings the model out. You're not able to see it in this picture but i also modelled the engine and some of the compartments
Final render shot, for some reason i lost the holes in the seats when rendered, i dont understand how.
At the start of my BA animation I was approached to work on 3 main films, The Deep, Chance Meeting and Hero 1.0. All these films required a lot of modelling a texturing, as they were all at the early production stages so I agreed to do a lot for them. For the deep i had the opportunity to model a sward fish as part of the inside of a submarine used in the film, i have had enough experience with modelling so i accepted the task. I was also asked to model a sofa which will also be used in the sub. here are the images i was given for the fish for ideas.
this first images was given to me by the director of The Deep, it was a rough idea of what i should aim for, I gathered my own research and found that there are a load of different species of swordfish. I particularly like the bottom left picture as the fish's fins are quite out of the norm. this could be because its a CG fish but im not too sure as im having trouble telling.
The image above was the image which i found most easy to model from, what i created from it was exactly what i wanted.
this is the early stages of my model, as you can see ive pretty much got the shape sorted. at this stage im missing the main bits like fins eyes and tail
the image above shows the finished fish. now i just needed the back to polish it off.
final model
Modeling for The Deep. Sofa
I was asked by the director to also model a sofa the interior of the sub in The Deep, he gave a rough idea and a rough sketch of what i should aim for. i gathered that the style he was aiming for was a Victorian sofa.. with bronze legs and leather surfaces. here is what the director gave me
From the image above u can see that i am aiming to have feet (possible lion shaped) to add to the Victorian style. I am also looking at red leather and a dark bronze effect on the surrounding supports.
Examples of what i am aiming for
this has to be my favorite image out of all. what draws me to this is the detail it has, it looks like its worth thousands of pounds! its also strangely elegant! however, its not what we were looking for for The Deep.
I used this image to get an idea of the colour/ tone, i also really like how much detail it has.
I used this last image to get an idea of how the legs need to curve around the body. at first i didnt think that the lion legs and feet were easy to model but the more i tried the better i got and the better they looked.
here are some of my attempts for the sofa.
i was not happy at all with this out come, i dont think it did justice to the images i used, it just didnt look like i had pictured at the start.
the sofa above looked better, it looked much more stylised and a little bit more of what the director wanted, i think its better to texture the sofa as you can make it look rough and old, which would fit in with the surrounding textures and lights in the sub.
her is my finished sofa, very happy with the results, as you can see its no longer coloured but with the right textures it can do the job!
Modelling for Hero 1.0
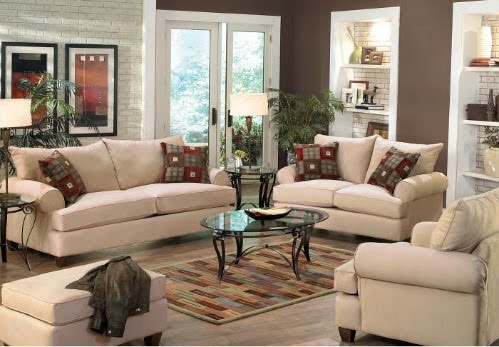
Once again i find myself modelling things which will not be used, I don't mind doing it as i know it's only adding to my skills, I was today set the task of modelling a sofa for Hero 1. the director gave me some images for reference and from what gathered it was pretty easy to model. it didnt really push me to a level where i hadnt been before but i enjoyed the practive. The images above show some examples of what I should aim for, i dont have to stick to them exactly but it gave me a rough idea of what the director of Hero 1.0 wanted from me. I used maya shaders to add colour to my sofa, it doesn't have a a uv map or textures done to it as the whole idea of using the sofa was scrapped. i am happy with the turn out, i may also return to it and add some more detail, maybe some cushions and some buttons. more modelling
I was told that the living room shot was going to be cut out while modelling a bookshelf, as always im not bothered as its only doing me good! i was given some references to what i should try to aim for, i also did some research myself to find a nice image to use for the modelling. Here they are. These images shows the style but doesn't really help me in terms of modelling, as you can see its got a lot of books and they're not exactly a challenge to model. I asked the director if this was more of what he wanted and he agreed, which meant that I could get a start on them. I got all my ideas and examples from looking at the Ikea website, they seem to have a lot of what the director was asking for. looking at my bookshelves at home i can see that hardly any books are actually on them, nowever, there are loads of other things like porcelains and ornaments. i asked the director if there was a chance of maybe adding other things not just books, he was happy with it so i decided to try to model the clock from the pictures above. i also used the CP curve tool to makes some vaces and still keep the look he wanted. here is an example of what I am currently working on. the clock has not been finished. full shot this last image looks very empty but all i need to do is group some of the books and duplicate them in different areas giving it a fuller look.
modelling for Chance meeting
I am set a job for Chance meeting which involves me modelling a quite difficult park bench, at first i didn't think it was possible but i gave it a shot and said yes to the task. the images bellow were used to help me get an idea of the bench in mind, it was rather intimidating when i was first shown but i managed to pull it off.
From the first glace I gave this picture I knew I would have to use nurbs circles and the loft tool, it might not be the perfect way to do it but that's what came into my head. What I found every useful when using this tool was that I was able to follow the curves down with simple nurbs circles.
here is another picture that i used during my modelling, i didnt use it to model but to get an idea of what i will have to aim for when it came to texturing it.
as you can see the modeling is all most finished, there are a few aspects to come back to but i just wanted to have a go on the textured as i now know that the bench will NOT be used for the shots, this is because the real bench has returned to the park! great..... at this current stage i was quite pleased with the results, i hadn't textures the metal supports but i was having a go at the wood. its not perfect but its a start.
Above is the "finished" bench, i have things like the legs to finish and some areas in the supports but i think its turned out quite well. texturing was not as hard as i thought but i know not to underestimate the process. things like finding the best surface textures or using the right shaders will either fool us into believing its real or simply make others point out your crappy work.
Personal learning
I enjoy working for the movies which i am a team member for but i also really like doing my own work when i have the time, i am aiming to get an idea of the work which is currently being done at framestore, my understanding is that there is a lot of high poly count modelling going on. High poly count modelling is something which i really want to get into. i have found a few tutorials online which i have been helping me get a better understanding of how it works. I know that there is a method of doing in and that its not just simply sculpting in a modelling software, i have learnt that u need to start with a low poly count model and build it up in layers. There are things which always need to be done before u start sculpting. E.g. the UV maps needs to be done before you can export any work from Maya to ZBrush or Mudbox. if this is not done properly I won't be able to add displacement maps or textures if i want to use the model for animation.
here is an example of my sculpting work
this first images is a very early stage of a lizard man character i was modelling. as you can see i have the basic shape but not much detail.
this next image shows my lizard man gaining a little bit more life as it now know has a more natural look.
this last image is what i finished off with, at this stage i realised that i couldnt really do much with this model besides look at it, this is because i never sorted out the CVs when i had the chance and now its a little too late, and it would be near enough impossible to do so as its so hi detailed.
here is a video of what the final model looked like, i have also removed the paint effect because i didnt think it did it any good.